
2.7 An Introduction to the Intel 80x86 CPU Family
Thus far, you've seen a couple of HLA programs that will actually compile and run. However, all the statements utilized to this point have been either data declarations or calls to HLA Standard Library routines. There hasn't been any real assembly language up to this point. Before we can progress any farther and learn some real assembly language, a detour is necessary. For unless you understand the basic structure of the Intel 80x86 CPU family, the machine instructions will seem mysterious indeed.
The Intel CPU family is generally classified as a Von Neumann Architecture Machine. Von Neumann computer systems contain three main building blocks: the central processing unit (CPU), memory, and input/output devices (I/O). These three components are connected together using the system bus. The following block diagram shows this relationship:
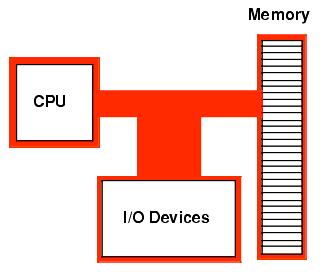
Figure 2.4 Von Neumann Computer System Block Diagram
Memory and I/O devices will be the subjects of later chapters; for now, let's take a look inside the CPU portion of the computer system, at least at the components that are visible to the assembly language programmer.
The most prominent items within the CPU are the registers. The Intel CPU registers can be broken down into four categories: general purpose registers, special purpose application accessible registers, segment registers, and special purpose kernel mode registers. This text will not consider the last two sets of registers. The segment registers are not used much in modern 32-bit operating systems (e.g., Windows, BeOS, and Linux); since this text is geared around programs written for 32-bit operating systems, there is little need to discuss the segment registers. The special purpose kernel mode registers are intended for use by people who write operating systems, debuggers, and other system level tools. Such software construction is well beyond the scope of this text, so once again there is little need to discuss the special purpose kernel mode registers.
The 80x86 (Intel family) CPUs provide several general purpose registers for application use. These include eight 32-bit registers that have the following names:
EAX, EBX, ECX, EDX, ESI, EDI, EBP, and ESP
The "E" prefix on each name stands for extended. This prefix differentiates the 32-bit registers from the eight 16-bit registers that have the following names:
AX, BX, CX, DX, SI, DI, BP, and SP
Finally, the 80x86 CPUs provide eight 8-bit registers that have the following names:
AL, AH, BL, BH, CL, CH, DL, and DH
Unfortunately, these are not all separate registers. That is, the 80x86 does not provide 24 independent registers. Instead, the 80x86 overlays the 32-bit registers with the 16-bit registers and it overlays the 16-bit registers with the 8-bit registers. The following diagram shows this relationship:

Figure 2.5 80x86 (Intel CPU) General Purpose Registers
The most important thing to note about the general purpose registers is that they are not independent. Modifying one register will modify at least one other register and may modify as many as three other registers. For example, modification of the EAX register may very well modify the AL, AH, and AX registers as well. This fact cannot be overemphasized here. A very common mistake in programs written by beginning assembly language programmers is register value corruption because the programmer did not fully understand the ramifications of the above diagram.
The EFLAGS register is a 32-bit register that encapsulates several single-bit boolean (true/false) values. Most of the bits in the EFLAGs register are either reserved for kernel mode (operating system) functions, or are of little interest to the application programmer. Eight of these bits (or flags) are of interest to application programmers writing assembly language programs. These are the overflow, direction, interrupt disable1, sign, zero, auxiliary carry, parity, and carry flags. The following diagram shows their layout within the lower 16-bits of the EFLAGS register.

Figure 2.6 Layout of the FLAGS Register (Lower 16 bits of EFLAGS)
Of the eight flags that are usable by application programmers, four flags in particular are extremely valuable: the overflow, carry, sign, and zero flags. Collectively, we will call these four flags the condition codes2. The state of these flags (boolean variables) will let you test the results of previous computations and allow you to make decisions in your programs. For example, after comparing two values, the state of the condition code flags will tell you if one value is less than, equal to, or greater than a second value. The 80x86 CPUs provide special machine instructions that let you test the flags, alone or in various combinations.
The last register of interest is the EIP (instruction pointer) register. This 32-bit register contains the memory address of the next machine instruction to execute. Although you will manipulate this register directly in your programs, the instructions that modify its value treat this register as an implicit operand. Therefore, you will not need to remember much about this register since the 80x86 instruction set effectively hides it from you.
One important fact that comes as a surprise to those just learning assembly language is that almost all calculations on the 80x86 CPU must involve a register. For example, to add two (memory) variables together, storing the sum into a third location, you must load one of the memory operands into a register, add the second operand to the value in the register, and then store the register away in the destination memory location. Registers are a middleman in nearly every calculation. Therefore, registers are very important in 80x86 assembly language programs.
Another thing you should be aware of is that although the general purpose registers have the name "general purpose" you should not infer that you can use any register for any purpose. The SP/ESP register for example, has a very special purpose (it's the stack pointer) that effectively prevents you from using it for any other purpose. Likewise, the BP/EBP register has a special purpose that limits its usefulness as a general purpose register. All the 80x86 registers have their own special purposes that limit their use in certain contexts. For the time being, you should simply avoid the use of the ESP and EBP registers for generic calculations and keep in mind that the remaining registers are not completely interchangeable in your programs.
2.8 Some Basic Machine Instructions
The 80x86 CPUs provide just over a hundred to many thousands of different machine instructions, depending on how you define a machine instruction. Even at the low end of the count (greater than 100), it appears as though there are far too many machine instructions to learn in a short period of time. Fortunately, you don't need to know all the machine instructions. In fact, most assembly language programs probably use around 30 different machine instructions3. Indeed, you can certainly write several meaningful programs with only a small handful of machine instructions. The purpose of this section is to provide a small handful of machine instructions so you can start writing simple HLA assembly language programs right away.
Without question, the MOV instruction is the most often-used assembly language statement. In a typical program, anywhere from 25-40% of the instructions are typically MOV instructions. As its name suggests, this instruction moves data from one location to another4. The HLA syntax for this instruction is
mov( source_operand, destination_operand );
The source_operand can be a register, a memory variable, or a constant. The destination_operand may be a register or a memory variable. Technically the 80x86 instruction set does not allow both operands to be memory variables; HLA, however, will automatically translate a MOV instruction with two 16- or 32-bit memory operands into a pair of instructions that will copy the data from one location to another. In a high level language like Pascal or C/C++, the MOV instruction is roughly equivalent to the following assignment statement:
destination_operand = source_operand ;
Perhaps the major restriction on the MOV instruction's operands is that they must both be the same size. That is, you can move data between two eight-bit objects, between two 16-bit objects, or between two 32-bit objects; you may not, however, mix the sizes of the operands. The following table lists all the legal combinations:
You should study this table carefully. Most of the general purpose 80x86 instructions use this same syntax. Note that in addition to the forms above, the HLA MOV instruction lets you specify two memory operands as the source and destination. However, this special translation that HLA provides only applies to the MOV instruction; it does not generalize to the other instructions.
The 80x86 ADD and SUB instructions let you add and subtract two operands. Their syntax is nearly identical to the MOV instruction:
add( source_operand, destination_operand );
sub( source_operand, destination_operand );
The ADD and SUB operands must take the same form as the MOV instruction, listed in the table above5. The ADD instruction does the following:
destination_operand = destination_operand + source_operand ;
destination_operand += source_operand; // For those who prefer C syntax
Similarly, the SUB instruction does the calculation:
destination_operand = destination_operand - source_operand ;
destination_operand -= source_operand ; // For C fans.
With nothing more than these three instructions, plus the HLA control structures that the next section discusses, you can actually write some sophisticated programs. Here's a sample HLA program that demonstrates these three instructions:
program DemoMOVaddSUB;


#include( "stdlib.hhf" );


static

    i8:     int8    := -8;

    i16:    int16   := -16;

    i32:    int32   := -32;


begin DemoMOVaddSUB;


    // First, print the initial values

    // of our variables.


    stdout.put

    (

        nl,

        "Initialized values: i8=", i8,

        ", i16=", i16,

        ", i32=", i32,

        nl

    );


    // Compute the absolute value of the

    // three different variables and

    // print the result.

    // Note, since all the numbers are

    // negative, we have to negate them.

    // Using only the MOV, ADD, and SUB

    // instruction, we can negate a value

    // by subtracting it from zero.


    mov( 0, al );   // Compute i8 := -i8;

    sub( i8, al );

    mov( al, i8 );


    mov( 0, ax );   // Compute i16 := -i16;

    sub( i16, ax );

    mov( ax, i16 );


    mov( 0, eax );  // Compute i32 := -i32;

    sub( i32, eax );

    mov( eax, i32 );


    // Display the absolute values:


    stdout.put

    (

        nl,

        "After negation: i8=", i8,

        ", i16=", i16,

        ", i32=", i32,

        nl

    );


    // Demonstrate ADD and constant-to-memory

    // operations:


    add( 32323200, i32 );

    stdout.put( nl, "After ADD: i32=", i32, nl );


end DemoMOVaddSUB;


Program 2.3	 Demonstration of MOV, ADD, and SUB Instructions
2.9 Some Basic HLA Control Structures
The MOV, ADD, and SUB instructions, while valuable, aren't sufficient to let you write meaningful programs. You will need to complement these instructions with the ability to make decisions and create loops in your HLA programs before you can write anything other than a trivial program. HLA provides several high level control structures that are very similar to control structures found in high level languages. These include IF..THEN..ELSEIF..ELSE..ENDIF, WHILE..ENDWHILE, REPEAT..UNTIL, and so on. By learning these statements you will be armed and ready to write some real programs.
Before discussing these high level control structures, it's important to point out that these are not real 80x86 assembly language statements. HLA compiles these statements into a sequence of one or more real assembly language statements for you. Later in this text, you'll learn how HLA compiles the statements and you'll learn how to write pure assembly language code that doesn't use them. However, you'll need to learn many new concepts before you get to that point, so we'll stick with these high level language statements for now since you're probably already familiar with statements like these from your exposure to high level languages.
Another important fact to mention is that HLA's high level control structures are not as high level as they first appear. The purpose behind HLA's high level control structures is to let you start writing assembly language programs as quickly as possible, not to let you avoid the use of real assembly language altogether. You will soon discover that these statements have some severe restrictions associated with them and you will quickly outgrow their capabilities (at least the restricted forms appearing in this section). This is intentional. Once you reach a certain level of comfort with HLA's high level control structures and decide you need more power than they have to offer, it's time to move on and learn the real 80x86 instructions behind these statements.
2.9.1 Boolean Expressions in HLA Statements
Several HLA statements require a boolean (true or false) expression to control their execution. Examples include the IF, WHILE, and REPEAT..UNTIL statements. The syntax for these boolean expressions represents the greatest limitation of the HLA high level control structures. This is one area where your familiarity with a high level language will work against you - you'll want to use the same boolean expressions you use in a high level language and HLA only supports some basic forms.
HLA boolean expressions always take the following forms6:
register not in LowConst..HiConst
A flag_specification may be one of the following symbols:
- @c carry: True if the carry is set (1), false if the carry is clear (0).
- @nc no carry: True if the carry is clear (0), false if the carry is set (1).
- @z zero: True if the zero flag is set, false if it is clear.
- @nz not zero: True if the zero flag is clear, false if it is set.
- @o overflow: True if the overflow flag is set, false if it is clear.
- @no no overflow: True if the overflow flag is clear, false if it is set.
- @s sign: True if the sign flag is set, false if it is clear.
- @ns no sign: True if the sign flag is clear, false if it is set.
The use of the flag values in a boolean expression is somewhat advanced. You will begin to see how to use these boolean expression operands in the next chapter.
A register operand can be any of the 8-bit, 16-bit, or 32-bit general purpose registers. The expression evaluates false if the register contains a zero; it evaluates true if the register contains a non-zero value.
If you specify a boolean variable as the expression, the program tests it for zero (false) or non-zero (true). Since HLA uses the values zero and one to represent false and true, respectively, the test works in an intuitive fashion. Note that HLA requires that stand-alone variables be of type boolean. HLA rejects other data types. If you want to test some other type against zero/not zero, then use the general boolean expression discussed next.
The most general form of an HLA boolean expression has two operands and a relational operator. The following table lists the legal combinations:
Note that both operands cannot be memory operands. In fact, if you think of the Right Operand as the source operand and the Left Operand as the destination operand, then the two operands must be the same as those allowed for the ADD and SUB instructions.
Also like the ADD and SUB instructions, the two operands must be the same size. That is, they must both be eight-bit operands, they must both be 16-bit operands, or they must both be 32-bit operands. If the Right Operand is a constant, it's value must be in the range that is compatible with the Left Operand.
There is one other issue of which you need to be aware. If the Left Operand is a register and the Right Operand is a positive constant or another register, HLA uses an unsigned comparison. The next chapter will discuss the ramifications of this; for the time being, do not compare negative values in a register against a constant or another register. You may not get an intuitive result.
The IN and NOT IN operators let you test a register to see if it is within a specified range. For example, the expression "EAX in 2000..2099" evaluates true if the value in the EAX register is between 2000 and 2099 (inclusive). The NOT IN (two words) operator lets you check to see if the value in a register is outside the specified range. For example, "AL not in `a'..'z'" evaluates true if the character in the AL register is not a lower case alphabetic character.
Here are some examples of legal boolean expressions in HLA:
2.9.2 The HLA IF..THEN..ELSEIF..ELSE..ENDIF Statement
The HLA IF statement uses the following syntax:
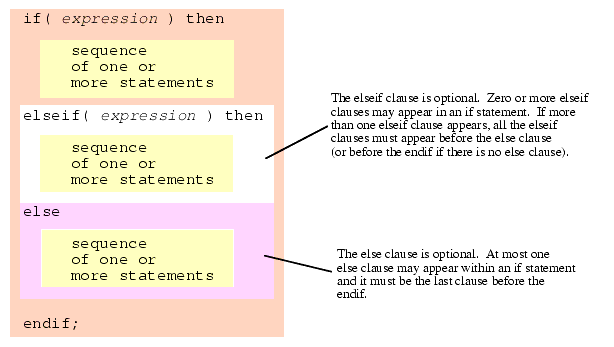
Figure 2.7 HLA IF Statement Syntax
The expressions appearing in this statement must take one of the forms from the previous section. If the associated expression is true, the code after the THEN executes, otherwise control transfers to the next ELSEIF or ELSE clause in the statement.
Since the ELSEIF and ELSE clauses are optional, an IF statement could take the form of a single IF..THEN clause, followed by a sequence of statements, and a closing ENDIF clause. The following is an example of just such a statement:
if( eax = 0 ) then


	stdout.put( "error: NULL value", nl );


endif;
If, during program execution, the expression evaluates true, then the code between the THEN and the ENDIF executes. If the expression evaluates false, then the program skips over the code between the THEN and the ENDIF.
Another common form of the IF statement has a single ELSE clause. The following is an example of an IF statement with an optional ELSE:
if( eax = 0 ) then


	stdout.put( "error: NULL pointer encountered", nl );


else


	stdout.put( "Pointer is valid", nl );


endif;
If the expression evaluates true, the code between the THEN and the ELSE executes; otherwise the code between the ELSE and the ENDIF clauses executes.
You can create sophisticated decision-making logic by incorporating the ELSEIF clause into an IF statement. For example, if the CH register contains a character value, you can select from a menu of items using code like the following:
if( ch = `a' ) then


	stdout.put( "You selected the `a' menu item", nl );


elseif( ch = `b' ) then


	stdout.put( "You selected the `b' menu item", nl );


elseif( ch = `c' ) then


	stdout.put( "You selected the `c' menu item", nl );


else


	stdout.put( "Error: illegal menu item selection", nl );


endif;
Although this simple example doesn't demonstrate it, HLA does not require an ELSE clause at the end of a sequence of ELSEIF clauses. However, when making multi-way decisions, it's always a good idea to provide an ELSE clause just in case an error arises. Even if you think it's impossible for the ELSE clause to execute, just keep in mind that future modifications to the code could possibly void this assertion, so it's a good idea to have error reporting statements built into your code.
2.9.3 The WHILE..ENDWHILE Statement
The WHILE statement uses the following basic syntax:
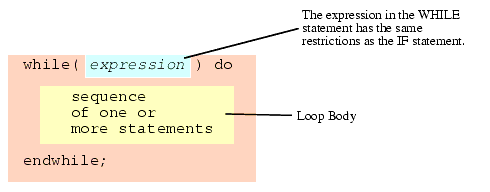
Figure 2.8 HLA While Statement Syntax
This statement evaluates the boolean expression. If it is false, control immediately transfers to the first statement following the ENDWHILE clause. If the value of the expression is true, then control falls through to the body of the loop. After the loop body executes, control transfers back to the top of the loop where the WHILE statement retests the loop control expression. This process repeats until the expression evaluates false.
Note that the WHILE loop, like its high level language siblings, tests for loop termination at the top of the loop. Therefore, it is quite possible that the statements in the body of the loop will not execute (if the expression is false when the code first executes the WHILE statement). Also note that the body of the WHILE loop must, at some point, modify the value of the boolean expression or an infinite loop will result.
mov( 0, i );

while( i < 10 ) do


	stdout.put( "i=", i, nl );

	add( 1, i );


endwhile;
2.9.4 The FOR..ENDFOR Statement
The HLA FOR loop takes the following general form:
for( Initial_Stmt; Termination_Expression; Post_Body_Statement ) do


	<< Loop Body >>


endfor;
This is equivalent to the following WHILE statement:
Initial_Stmt;

while( Termination_expression ) do


	<< loop_body >>


	Post_Body_Statement;


endwhile;
Initial_Stmt can be any single HLA/80x86 instruction. Generally this statement initializes a register or memory location (the loop counter) with zero or some other initial value. Termination_expression is an HLA boolean expression (same format that WHILE allows). This expression determines whether the loop body will execute. The Post_Body_Statement executes at the bottom of the loop (as shown in the WHILE example above). This is a single HLA statement. Usually it is an instruction like ADD that modifies the value of the loop control variable.
The following gives a complete example:
for( mov( 0, i ); i < 10; add(1, i )) do


	stdout.put( "i=", i, nl );


endfor;


// The above, rewritten as a while loop, becomes:


mov( 0, i );

while( i < 10 ) do


	stdout.put( "i=", i, nl );


	add( 1, i );


endwhile;
2.9.5 The REPEAT..UNTIL Statement
The HLA repeat..until statement uses the following syntax:

Figure 2.9 HLA Repeat..Until Statement Syntax
The HLA REPEAT..UNTIL statement tests for loop termination at the bottom of the loop. Therefore, the statements in the loop body always execute at least once. Upon encountering the UNTIL clause, the program will evaluate the expression and repeat the loop if the expression is false (that is, it repeats while false). If the expression evaluates true, the control transfers to the first statement following the UNTIL clause.
The following simple example demonstrates one use for the REPEAT..UNTIL statement:
mov( 10, ecx );

repeat


	stdout.put( "ecx = ", ecx, nl );

	sub( 1, ecx );


until( ecx = 0 );
If the loop body will always execute at least once, then it is more efficient to use a REPEAT..UNTIL loop rather than a WHILE loop.
2.9.6 The BREAK and BREAKIF Statements
The BREAK and BREAKIF statements provide the ability to prematurely exit from a loop. They use the following syntax:

Figure 2.10 HLA Break and Breakif Syntax
The BREAK statement exits the loop that immediately contains the break; The BREAKIF statement evaluates the boolean expression and terminates the containing loop if the expression evaluates true.
2.9.7 The FOREVER..ENDFOR Statement
The FOREVER statement uses the following syntax:
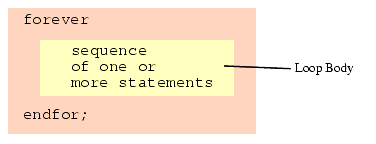
Figure 2.11 HLA Forever Loop Syntax
This statement creates an infinite loop. You may also use the BREAK and BREAKIF statements along with FOREVER..ENDFOR to create a loop that tests for loop termination in the middle of the loop. Indeed, this is probably the most common use of this loop as the following example demonstrates:
forever


	stdout.put( "Enter an integer less than 10: ");

	stdin.get( i );

	breakif( i < 10 );

	stdout.put( "The value needs to be less than 10!", nl );


endfor;
2.9.8 The TRY..EXCEPTION..ENDTRY Statement
The HLA TRY..EXCEPTION..ENDTRY statement provides very powerful exception handling capabilities. The syntax for this statement is the following:

Figure 2.12 HLA Try..Except..Endtry Statement Syntax
The TRY..ENDTRY statement protects a block of statements during execution. If these statements, between the TRY clause and the first EXCEPTION clause, execute without incident, control transfers to the first statement after the ENDTRY immediately after executing the last statement in the protected block. If an error (exception) occurs, then the program interrupts control at the point of the exception (that is, the program raises an exception). Each exception has an unsigned integer constant associated with it, known as the exception ID. The "excepts.hhf" header file in the HLA Standard Library predefines several exception IDs, although you may create new ones for your own purposes. When an exception occurs, the system compares the exception ID against the values appearing in each of the one or more EXCEPTION clauses following the protected code. If the current exception ID matches one of the EXCEPTION values, control continues with the block of statements immediately following that EXCEPTION. After the exception handling code completes execution, control transfers to the first statement following the ENDTRY.
If an exception occurs and there is no active TRY..ENDTRY statement, or the active TRY..ENDTRY statements do not handle the specific exception, the program will abort with an error message.
The following sample program demonstrates how to use the TRY..ENDTRY statement to protect the program from bad user input:
repeat


	mov( false, GoodInteger );   // Note: GoodInteger must be a boolean var.

	try


		stdout.put( "Enter an integer: " );

		stdin.get( i );

		mov( true, GoodInteger );


	exception( ex.ConversionError );


		stdout.put( "Illegal numeric value, please re-enter", nl );


	exception( ex.ValueOutOfRange );


		stdout.put( "Value is out of range, please re-enter", nl );


	endtry;


until( GoodInteger );
The REPEAT..UNTIL loop repeats this code as long as there is an error during input. Should an exception occur, control transfers to the EXCEPTION clauses to see if a conversion error (e.g., illegal characters in the number) or a numeric overflow occurs. If either of these exceptions occur, then they print the appropriate message and control falls out of the TRY..ENDTRY statement and the REPEAT..UNTIL loop repeats since GoodInteger was never set to true. If a different exception occurs (one that is not handled in this code), then the program aborts with the specified error message7.
Please see the "excepts.hhf" header file that accompanies the HLA release for a complete list of all the exception ID codes. The HLA documentation will describe the purpose of each of these exception codes.
1Application programs cannot modify the interrupt flag, but we'll look at this flag later in this text, hence the discussion of this flag here.
2Technically the parity flag is also a condition code, but we will not use that flag in this text.
3Different programs may use a different set of 30 instructions, but few programs use more than 30 distinct instructions.
4Technically, MOV actually copies data from one location to another. It does not destroy the original data in the source operand. Perhaps a better name for this instruction should have been COPY. Alas, it's too late to change it now.
5Remember, though, that ADD and SUB do not support memory-to-memory operations.
6Technically, there are a few more, advanced, forms, but you'll have to wait a few chapters before seeing these additional formats.
7An experienced programmer may wonder why this code uses a boolean variable rather than a BREAKIF statement to exit the REPEAT..UNTIL loop. There are some technical reasons for this that you will learn about later in this text.
|